For this project you will use value to complete the torn portrait of your choice.
- Do a goggle search to find a black and white image 8.5 x 11. (850px x 1000 px minimum size)
- Right click ad download image to your desktop
- Double click to open image from desktop in photo app
- DO NOT PLACE THE IMAGE INTO A WORD DOC OR A GOOGLE DOC to print !!!!
- Print the image out to fill the entire sheet of paper.
- Before you tear place the printout on top of a piece of drawing paper and make marks where the corners land.
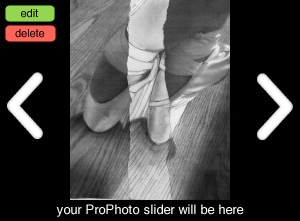
- Tear a 3 inches (length of index finger) section out of the center of the print out. I usually recommend tearing from one cornet to the other.
- Use a glue stick to glue the two outer pieces, make sure before you glue that you have the right amount of space in the center for the missing piece. Your corners should line up with the marks you made before you tore the paper. If there is too much space your proportions will be off. Make sure you have all the torn edges glues well so that you can continue the drawing in the center without ripping the paper
- Create a light contour drawing first. for all the items missing from the middle….DO NOT SHADE UNTIL YOU HAVE ALL THE LINE IN THE RIGHT PLACE! You can use your pencil to check spacing. Make sure you show me the contour lines before you move on. This way we can make sure nothing is out of place.
- Once I approve your contour lines you can start shading you image. Make sure you start light and build the value up. Use a blending stick or your finger to blend the shading and Use a kneaded erasure to add highlight back in.
.jpg)
.jpg)
.jpg)
.jpg)
.jpg)
.jpg)
.jpeg)
.jpeg)
.jpeg)
.jpeg)
.jpeg)
.jpeg)
.jpeg)